Tuesday, October 9, 2012

Mini Raw Key Lime Pies


One of my favorite desserts ever is key lime pie.  I remember going to Florida and knowing that meant 3 things...1) I was going to get to get a tan 2) I was going to eat seafood every night and 3) I was going to gain 5 lbs eating the best key lime pie I had ever put in my mouth.  If I made these key lime cupcakes and sat outside with a sounds of the ocean CD on I could almost swear I was in Florida that's how close they are to the "real deal".

Ingredients:
- 24 cupcake liners

Crust:

- 3/4 c raw almonds
- 3/4 c raw walnuts or pecans
- 1/2 c dates
- 1 tsp coconut oil
- 1/4 tsp sea salt
- 1/2 tsp cinnamon
- Unsweetened coconut flakes

Filling:
- 3 cups raw cashews (soaked overnight)
- 1/3 c coconut oil
- Juice of 7 limes, zest of 4
- Juice of one lemon
- 1/2 tsp sea salt
- 3/4 c agave, honey, or maple syrup (I used 1/2 c honey and 1/4 c stevia to cut back on calories)

Whipped Topping (optional):
- 1 can organic full fat coconut milk (refrigerated for at least 2 hours)
- 1 T agave
- 2 tsp vanilla

Directions:
- Place entire, unopened can of coconut milk in the refrigerator
- Place cupcake liners in muffin tins
- Place all ingredients for crust, except for coconut flakes, in food processor and pulse until crumb-like
- Sprinkle bottoms of cupcake liners with coconut to prevent crust from sticking
- Press crust mixture into bottom of liners and freeze until set (1 hour)
- While crust is setting, place ingredients for filling in high speed blender or food processor and blend until smooth
- Divide evenly on top of crusts and place back in freezer for another hour
- To make whipped topping, open refrigerated can of coconut milk and scoop the solids that have separated to the top of the can into a small mixing bowl
- Using a whisk, mix the coconut milk solids with the the agave and vanilla until fluffy and whipped
- Refrigerate "whipped cream" until you are ready to serve the pies

Mini Raw Strawberry Cheesecakes


I love having a fancy little raw party dessert to impress my meat-eating and vegetarian friends alike.  Bring these to a party and watch them disappear.  No one will ever know they don't contain eggs, cream cheese and refined sugar....that is unless you tell them ;-) The best part is...since you don't have to bake them, you can make this large scale, or go the route I did and use cupcake liners for an easy grab and go option either way you choose you don't have to worry about adjusting pesky cooking times...because they're raw.........................did I mention they're raw?

Ingredients:
Crust:
- 3/4 c raw almonds
- 3/4 c raw walnuts or pecans
- 1/2 c dates
- 1 tsp coconut oil
- 1/4 tsp of sea salt
- Unsweetened coconut flakes

Filling:
- 3 cups raw cashews (soaked at least 3 hours but preferably overnight)
- 3/4 c lemon juice
- 3/4 c agave
- 1/2 c coconut oil
- 1 T vanilla
- Water (keep on hand in case you need to thin out during blending)

Topping:
- 6 large frozen strawberries (or other fresh or frozen fruit of your choice)
- 1/2 c dates

Directions:
- Go ahead and place frozen strawberries in a bowl on the counter to thaw
- In a high speed blender or food processor, blend all ingredients for crust except coconut flakes
- Sprinkle coconut flakes in bottoms of cupcake liners to prevent crust from sticking
- Press crust mixture into liners and freeze while you make the filling
- In a high speed blender or food processor, add all ingredients for filling.  Add water a little at a time, if needed to achieve desired consistency (you shouldn't need more than 4 T)
- Divide filling evenly on top of your crusts and place back in the freezer (let sit for an hour to set)
- To make the topping, combine thawed frozen strawberries and 1/2 c dates in food processor and blend well.  Once filling has set in freezer, top evenly with topping and place back in the freezer until ready to eat. (Note: if you wish to get a little fancy, you can also omit this last step, remove the liner and plate the cheesecakes and drizzle the thawed topping on top with some fresh strawberries as garnish)
- Take out 15 minutes beforehand so that they can thaw slightly and enjoy!

Southwestern Quinoa

I spent ALL day cooking yesterday.  I was going to my grandma's and, since she never makes it over to our neck of the woods for dinner, wanted to bring dinner to her.  On top of that I had made a whole batch of mini raw strawberry cheesecakes and key lime pies AND still had to pack for the week AND take all these pictures for the blog...needless to say, I was running around like a chicken with my head cut off :-) In the midst of all the chaos and commotion in the kitchen I nearly cut the tip of my thumb off.  As much as I LOVE cooking...I am relieved to just be sitting down today blogging.  Far away from any potentially hazardous sharp objects :-) This is the perfect accompaniment to my Walnut Crusted Salmon with Mango Mustard recipe.  It can be made ahead, which is always a plus, AND it tastes so fresh and summery.  I can imagine serving it with all sorts of meals...It would be epic with some Carne Asada tacos and plantains.
  
Ingredients:
- 1 c. quinoa
- 2 mangos (diced)
- 2 jalepenos (minced)
- 1 medium red bell pepper (diced)
- 1/2 c chopped cilantro
- 1/2 of a small red onion
- 1 cup fresh or frozen corn
- 15 oz can of black beans (rinsed and drained)
- Juice of 2 limes
- 2 T olive oil
- 2 garlic cloves (minced)
- 1/2 tsp ground cumin
- 1/2 tsp chili powder
- 1/2 tsp tumeric
- 1/2 tsp Sea salt to taste
- 1/4 tsp black pepper


Directions:
- Cook quinoa according to package directions
- Combine ingredients through black beans in a large mixing bowl
- Whisk together remaining ingredients (lime juice through salt) and pour over quinoa mixture
- Stir well to combine and refrigerate until ready to serve


Tuesday, October 2, 2012

Warm Tomato Kale Salad


I love salad.  Especially in the summer.  There is nothing like a fresh, crisp, cold salad in the heat of the summer.  But it's not fair to the salad that I limit it to one season.  That is where a nice hearty warm salad comes in.  A warm salad is the beef stew to my gazpacho, the eggnog to my mojito, the sweater to my bikini.  This salad is the perfect transition from the heat of the summer to a chilly fall night.  With its fresh roasted basil garlic tomatoes and hearty kale it's sure to make it into your winter sides rotation.  Don't believe me ask the dishes...
.....they don't lie :-)

Ingredients:
- Kale (I bought mine in a bag already cut and destemmed and then chopped it chiffonade)
- Juice of 1 Lemon
- 1 T Olive Oil
- Himalayan sea salt (to taste)
- 6 plum tomatoes cut in half either length or width wise (make sure to take a little sliver off the base so it sits flat on the baking sheet)
- 1/2 c Fresh Basil (cut chiffonade)
- 5 cloves fresh garlic (minced)
- Salt (to taste)
- Optional: toasted pine nuts


Directions:
Preheat oven to 300.  Massage kale with lemon juice and olive oil and let sit to soften.  Place tomatoes on baking sheet. Spray and rub with Pam olive oil spray.  Sprinkle generously with salt, top with garlic and basil.   Bake for 35 min or longer until  tomatoes soften and begin to collapse (trust me, the longer the better...lol....that's what she said).  Anyways, when the tomatoes are done place on top of a bed of your marinated kale, sprinkle with toasted pine nuts, and dig in! So good!

Spinach Mushroom Stuffed Chicken

Okay, so I'm supposed to be studying and doing homework that is due tomorrow, but I am so excited about this dish that I had to post it first.  Priorities.  This is one of those dishes that doesn't taste healthy, but is :-) I love those kind of recipes, don't you? I served this with Warm Tomato Kale Salad and they were both divine.

I keep the crust, minus the seasonings, and the cashew cream premade.  This way they're always on hand when I need them, which is quite often, and I can just spice them up according to the particular dish at hand.  

Ingredients:
Crust:
- 3 oz. Raw Walnuts
- 2-3 T Flax Seed
- Italian Seasoning
- Himalayan salt

Directions:
- Pulse ingredients in food processor until a breadcrumb-like texture is achieved (put in refrigerator until ready to use)

Stuffing:
- 4 oz. Raw Cashews (soaked for at least 3 hours)
- Juice of 1/2 a lemon
- Water
- 1 small package button mushrooms
- 2 green onions (diced)
- 5 c of spinach (chopped)
- 2 cloves of garlic
- 4-4oz skinless boneless chicken breasts
Directions:
- Preheat oven to 350
- Place soaked cashews in food processor with lemon juice and 1/4 c water and pulse until smooth and creamy.  Add more water a little at a time until desired consistency is achieved (you don't want it to run out of the chicken)
- Place mushrooms, green onions, and garlic in food processor with cashew cream and pulse until a coarse paste is formed

- Pound chicken as thin as possible without tearing
- Spread mixture on chicken, roll, and secure with toothpicks
- Spray pan with Pam and place chicken seam side down (Note: my sister was studying so I spared her the noise of me pounding the chicken and just cut out a pocket and stuffed that.  If you do go this route, place seam side up so your filling doesn't seep out)
- Coat top and sides with "breadcrumb" mixture

- Bake for 20-30 min, Let stand for 5 min then Enjoy


I served this with my Warm Tomato Kale Salad

Monday, October 1, 2012

My Favorite Little Green Monster

My raw food loving friend Lisa invited me to her house awhile back to play around with some raw recipes.  I was definitely not a raw foodie at the time...as a matter of fact, I was tossing back 2 happy meals a day and filling my body full of all sorts of processed, pasteurized, and pesticide loaded food.  I DID, however, enjoy cooking and trying new things, and making cream cheese out of cashews and chocolate pudding out of avocados was definitely new for me :-) For breakfast we juiced.  Although I loved the juice I didn't love the cleanup and thought, "I cannot see myself doing this everyday." So my juice-making days started and ended at Lisa's house that day.

Ever since I started my new food life I have been hinting at a Vitamix for my birthday/Christmas gift from my mom, dad, fiance, grandma, and anyone else who, I knew, would feel obligated to get me something.  I think they all thought I was on crack for asking for a $500 blender.  Another friend of mine looked at me and shook her head as if I had just set women/the feminist movement back 50 years.  No one understood that this wasn't JUST a blender...it was a game changer.

Then, one day I was sitting on the couch with my mom and this infomercial popped up advertising this Nutribullet.  It claimed to break down the cell wall of the fruits and vegetables yada yada yada just like the Vitamix.  I was skeptical, but I hopped online and started reading one amazing review after another.  I hopped online, reserved one at Bed Bath and Beyond (which is the best place to get one because it was only $80.00 with my 20% off coupon versus $130 on TV).  The next morning we went to go pick it up and the manager told us they couldn't keep the things on the shelf.

I LOVE it! It isn't a Vitamix in that you can't use it like a food processor.  Once you put something in there, it's liquidized, no pulsing to chop etc.  It also doesn't hold as much, so if you want to make an entire raw cheesecake you might be doing so in batches.  That being said, if you want the juice without the juicing this baby is perfect!

Tropical Green Monster
- 2 handfuls spinach
- 1/2 banana or 1/4 avocado
- 1/2 c fresh pineapple
- 1/2 fuji apple
- 1/2 pear
- 1 T Flax seed
- 1 c. coconut water
-1/2 c filtered water (or an extra 1/2 c coconut water)

Place all ingredients in blender and well....blend
I also like to pour some into Popsicle molds to enjoy later as a healthy frozen treat :-)

Wednesday, September 26, 2012

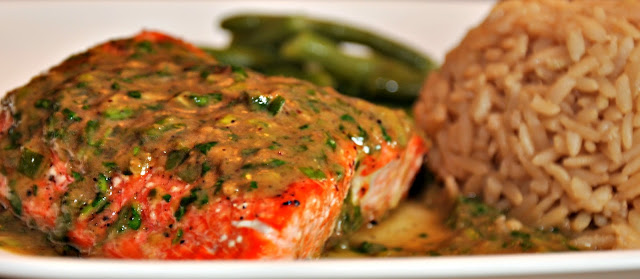
Walnut Crusted Salmon with Mango Mustard


Like I said before...I am not a fan of salmon, but I know how good it is for me so I have been experimenting with it.  I believe that you can learn to like anything if you just find the right way to prepare it.  Much to my fiance's dismay, I am still trying to prove that to him by slipping mushrooms and onions into his food lol.  
This is the perfect dish for entertaining the presentation is gorgeous, the taste is unreal, and, if you make the crumbs and sauce ahead of time, it only takes 20 min to have dinner ready and on the table.

Ingredients:
Crust:
- 2.5 oz raw walnuts
- 1.5 T Flax seeds
- 1/2 tsp dried dill
- 1/4 tsp salt
- Zest of 1 lemon
- Dash or 2 of salt free all purpose seasoning

Sauce:
- 1.5 T Apple cider vinegar
- 1.5 T Dijon Mustard
- 1 tsp honey
- 1 c mango

- 16 oz Salmon

Make Ahead:
I like to make my sauce and "breadcrumbs" ahead so the sauce can sit and the flavors can blend.  Plus it makes this dish one of the quickest and easiest dishes to prepare once those things are made.
- For the Crust: Place walnuts in a nutribullet, vitamix, or food processor and blend until they look like breadcrumbs.  Transfer to a bowl, add all other ingredients, cover and refrigerate until ready to use
- For the Sauce: Place all ingredients into a nutribullet/vitamix/food processor and blend well.  (Note: I am not sure if a food processor will give you the smoothest texture possible.  It may come out chunkier, but it will still taste AMAZING)

- Preheat oven to 350 F
- Place salmon skin side down on a dish.  Place half of sauce in a seperate bowl.  Use this bowl of sauce to brush/spread on salmon.
- Top with breadcrumbs and let sit for an hour in the refrigerator
- Spray lightly with Pam
- Cook for 20 min or until salmon flakes easily with a fork


Tuesday, September 18, 2012

Chicken Broccoli Alfredo

Chicken Alfredo has always been one of my favorite meals.  I remember when I was a kid and it was all I ate when we went out.  Then I grew up and realized exactly how unhealthy that creamy, cheesy, buttery, carb-filled goodness was and it was bye bye Chicken Alfredo hello bland salads...until now that is!
Not only is this so much healthier, but I would venture to say it is better tasting than 95% of the "real" Pasta Alfredo I have ever had! And I know my Alfredo people ;-)

Ingredients:
Sauce:
- 6 oz raw cashews
- 1 cup water
- Juice of 1 lemon
Pasta:
- 3 Zucchini
- 4 oz free range chicken
- Mrs. Dash Garlic and herb (or whatever you wish to season your chicken with)
- Steam Fresh frozen broccoli

Directions:
- Soak cashews for at least 3 hours (the longer the better)
- After your cashews have soaked place them in a high speed blender with lemon juice and 4 T of water.  Blend.  Add water a little at a time and blend to achieve desired consistency. Cover and place in fridge until ready to use.
- Season chicken with Mrs Dash, Himalayan sea salt, and pepper to taste
- Spray grill with Pam and preheat to high.  Once grill is preheated, reduce to medium and place chicken on grill.  Grill 5 min a side or until done.
- While chicken is cooking, Prepare zucchini noodles either in your spiralizer or by using a vegetable peeler to create thin fettuccine-like strips.
- Cook Steam Fresh broccoli according to package directions.
- Plate zucchini noodles, top with 1/4-1/3 of the cashew sauce.  Mix well.  Top with broccoli and grilled chicken strips. Mix well before eating so that the cashew goodness coats every bite.
- Top with Himalayan sea salt.  I'm generally not a salter but it makes a big difference in the flavor of this dish

Sunday, September 16, 2012

Beef Stroganoff


Yesterday was my 3 year old niece's birthday party and man was it tempting to dig into that pizza and those cupcakes.  I had to keep reminding myself how much I would hate myself in the morning if I caved :-) Seeing all that cheesy goodness made me realize...I miss cheesy goodness.  I can say no to sweets, but bread and cheese are my weaknesses.  I knew, after smelling that pizza, I would have to find some way to get creative and satisfy my carb and cheese craving, and quick!
I pulled out my spiralizer and churned out some zucchini noodles, soaked my cashews, and came up with a dish that made me think..."I could do this forever!" 
I know it doesn't look very appealing, but man oh man was it DELICIOUS! I mean it was comment-after-every-bite-we-took good!!

Ingredients:
Cashew Cream:
- 6 oz raw cashews (soak in cold water for 3 hours)
- 1 cup of water

Pasta:
- 3 large Zucchini
- Lean grassfed ground beef
- Mushrooms (sliced)
- Onion (sliced into strips)
- Worcestershire sauce (4 dashes)
- 2 cloves garlic (minced)
- Himalayan sea salt and pepper (to taste)
- 1 T. Mrs Dash Garlic and Herb 

Directions:
- You can make cashew cream in advance and store in the refrigerator for up to 7 days.  Just place soaked nuts in blender with about 4 T of the water and blend adding more water until a sour cream-like consistency is acheived
- Peel your zucchini and spiralize.  Or, if you don't have a spiralizer, use your vegetable peeler to make fettuccine-type noodles 
- Heat a skillet over medium high heat.  Spray with pam and add meat, brown
- Toss in your worchestershire, garlic, salt, pepper, and Mrs. Dash
- Add onions and mushrooms and sautee until you begin seeing some nice crisp brown bits
- Divide zucchini among plates
- Top with Beef, mushroom, onion mixture and cashew cream.
- Stir well to coat everything in cashew cream
- Enjoy

Saturday, September 8, 2012

Asian Tuna Slaw Salad


This salad is delicious, quick and easy, low calorie, and chock full of protein.

Ingredients:
- Sushi grade tuna steaks
- Himalayan salt
- Pepper
- Sesame oil
- Baby Spinach
- Broccoli slaw
- 3T. Kraft Lite toasted sesame dressing
- Wasabi powder
- Water
- Raw slivered almonds
Optional Toppings:
- Edamame
- Roasted red bell peppers

Directions:
- Salt and pepper tuna steaks to taste
- Heat skillet (I used my cast iron griddle) to high, after skillet is good and hot (so that a drop of water dances across the top) take a paper towel and carefully spread oil evenly over surface
- Cook tuna 2-3 min a side (the good thing about tuna is that you can see the doneness from the outside)
- Meanwhile, take a tablespoon of wasabi powder and mix it with enough water to make it drizzle-able (about the same consistency of the dressing)
- Grab a dinner plate and pile on the spinach, broccoli slaw, and roasted bell peppers and edamame, if using
- Slice tuna steak into strips and place on top
- Drizzle with dressing and wasabi drizzle
- Top with slivered almonds


Tuesday, September 4, 2012

Spaghetti Squash Noodles with Bolognese Sauce


Now this recipe is a little involved, but quadruple it and freeze the rest and it will be well worth it...trust me.

Here is the link for the sauce: Bolognese Sauce Recipe

Directions for Spaghetti Squash:
Stab spaghetti squash repeatedly with sharp object (Note: if you don't do this you will end up with squash guts all over your microwave).  Place on plate in microwave and microwave on high for 12-14 min.  Cut squash in half lengthwise.  Discard of seeds and stringy stuff in the middle (and yes "stringy stuff" is a technical term).  Use a fork or spoon and scrape the meat of the squash from the flesh.  It will come out as little spaghetti strands :-)
Really delicious and really healthy.

Note: You could also make this sauce with spiralized zucchini noodles if you prefer

Ceviche


I have been super busy with school and was sick and tired of laboring over the grill and the stove all day.  My fiance is from Peru and when we go there we gorge ourselves on the most delicious ceviche the coast has to offer.  It's like summer on a plate, cold, refreshing and tart.  It's also SUPER delicious, SUPER healthy and SUPER easy and SUPER gorgeous...the superfecta of the perfect meal.
Serve it up with 1/2 an avocado (sliced into strips) and sweet potato cubes sprayed with Pam and dusted with cinnamon, cayenne powder, and Himalayan sea salt then roasted in a 425 degree oven for about 40 min (turn halfway through).

Prep Time: 30 min (but can be done ahead)
Cook Time: 0 :-)
Sit Time: 3.5-4 hrs

Ingredients:
- 2 lbs Tilapia (diced into 1/2 in cubes)
- 1 c diced plum tomatoes (seeded)
- 1 red onion (diced)
- 2 jalapenos (chopped)
- 1/2 c lime juice
- 1/2 c lemon juice (although if you don't have lemons a cup of lime will work fine)
- A few dashes of hot sauce
- 2 tsp salt
- 1 bunch cilantro
- Avocado

Directions:
- Toss Tilapia cubes, tomatoes, onion, and jalapeno together in a non-reactive dish (such as Pyrex or ceramic)
- Sprinkle with salt and hot sauce
-Pour lemon/lime juice on top, Stir to coat, Cover and refrigerate for 4 hours stirring every hour
- After four hours garnish with cilantro, serve with sliced avocados and roasted sweet potatoes on the side, and ENJOY

Wednesday, August 15, 2012

Ch Ch Ch Ch Changes

Okay guys...I'm starting a new food lifestyle change.  I have been wanting to go more natural for awhile now and this is just the next step.  This isn't some fad diet.  All natural, no canned food, no preservatives and a bunch of stuff I've never used before.  For examples, I can have spelt, barley, quinoa, buckwheat, and millet? But... I don't have any idea what these are typically used for or what they taste like (except quinoa...I've had that before).  If any of you have any suggestions or taste descriptions for these ingredients, shoot them over to me :-)
Now, don't get all pissy with me.  This doesn't mean I'm going to stop writing in my blog...it just means things are going to get real around here (and by real I mean more natural) It's for the better, really.

Sunday, August 12, 2012

My Muffin Tin Obsession

I have been a little obsessed with 
recipes involving muffin tins lately.  


I love them because they are perfect for portioning out your food.  Once you calculate the calories in one muffin tin serving there is no more counting or measuring involved.  The Bacon-Wrapped Egg Muffins I make, for example, have 120 calories each.  There are so many things you can make in a muffin tin.
They are perfect if you have to pack a lunch for school or work.  You can pop them out, refrigerate them, freeze them, toss them in you lunchbox, reheat them, and enjoy.
Check out my Pinterest page under "Muffin Tin Obsession" for more muffin tin ideas.  Some are healthy, some are not, but, if nothing else, it will give you a starting point to dream up some of your own muffin tin masterpieces.


Here are some quick muffin tin ideas to get your creative juices flowing:
(Comment and tell me any muffin tin ideas you have too ;-D )

  1. Soups
  2. Smoothies
  3. Popsicles
  4. Frittatas
  5. Crab or Salmon Cakes
  6. Lasagna
  7. Meatloaf
  8. Tacos
  9. And of course cupcakes and muffins

Saturday, August 11, 2012

Mashed Cauliflower

So apparently I'm a little obsessed with cauliflower right now.  Maybe it's because it can be converted into some of my favorite starchy foods: pizza crusts, rice, and even mashed potatoes.  Things that were no no's before are now yes yes's thanks to this miraculous heaven-sent vegetable.
So here it goes, get ready to have your mind blown! 

Ingredients:
- 1 head of cauliflower
- Skim Milk
- 3T. Light Butter
- 1/4 c. parmesan
- 1/4 c Plain Greek Yogurt
- 1 tsp garlic salt
- 1/2 c. chives, chopped
- Optional: Dried parsley to top 

Directions:
- Peel leaves, wash, and cut stems off cauliflower
- Place in a pot of boiling water and boil until tender (approx. 6 min)
- Drain, pat dry and immediately transfer to mixer
- Add milk, parmesan, yogurt, garlic salt, butter and chives to mixer
- Blend until smooth, but no gluey


Friday, August 10, 2012

Riced Cauliflower 2 Ways

Mexican Riced Cauliflower

After my great success with cauliflower pizza last night, I was left with a dilemma.  What do I do with all this leftover riced cauliflower.  I opened up the fridge, looked in the pantry, and assessed my ingredients options.  Being that I had made my Salmon con Mojo a couple nights prior, I had some leftover Mojo goodness.  I also had some leftover corn from the Cauliflower Crust Shrimp Pizza.  I also had a can of black beans in the pantry....so here's what I came up with.

Ingredients:
- 1 head cauliflower, riced*
- Mojo Sauce (1/2 the recipe should be plenty)
- Steamfresh frozen corn kernels (prepared according to package directions)
- 1 can black beans (rinsed and drained)

*To rice your cauliflower:
Take head of cauliflower and remove stems and leaves
Coarsely chop and throw into you food processor
Pulse until cauliflower resemble coarse grain (do not over-pulse as this will create a puree)
Place in a microwave safe container and microwave on high for 8 min.
Directions:
- Mix Mojo Sauce with riced cauliflower, beans, and corn

This will replace my rice dish anytime I make any Mexican dish! 

Servings: 
Calories: 


Fried Riced Cauliflower

Ingredients:
- 1/2 head cauliflower, riced according to instructions above
- 3 green onions, chopped
- 4 cloves garlic, minced
- 2-3 T. low sodium soy sauce
- 1 tsp garlic salt
- 3 eggs, beaten
- Oil
- Optional: pork, chicken, or shrimp

Directions:
- In a wok, or large skillet, heat enough oil to barely cover the bottom of the pan.  Fry the minced garlic and the white part of the green onion for approx 1 min.  Add cauliflower and fry for approx 5 min stirring constantly.  Add soy sauce, garlic salt, green onion tops, and meat (if using) and stir until mixed.  Push this mixture to one side of pan.  Spray empty side with Pam, if needed, and fry the eggs until done.  Stir eggs into rice and remove from heat.

Servings: 3
Calories w/o meat: 155


Thursday, August 9, 2012

Cauliflower Crust Pizza

So I was craving pizza something fierce, but my pre-life change pizza recipe contained 3 1/2 cups of white flour...that's 1400 calories for the crust ALONE! NO TOPPINGS!!! CRAZY!!!!! Anyways, this recipe uses a cup of cauliflower, 30 calories, a cup of mozzarella, 240 calories; and 1 egg, 70 calories....
340 calories for the ENTIRE crust! 
1/4 the calories of my original recipe!
Now that's more like it :-)

Ingredients:
- 1 c. cooked, riced cauliflower (see instructions below)
- 1 c shredded mozzarella cheese
- 1 egg beaten
- 1 tsp dried oregano
- 1/2 tsp crushed garlic
- 1/2 tsp garlic salt
- Olive oil or Pam
***Some people have said that you can cut the cheese in half and it still tastes good


Toppings:
Pizza #1
- Pizza Sauce
- Provolone Slices (4 rounds) (I chose to use Provolone vs Mozzarella since the crust contained so much)
- Cold Cut Salami (4 rounds)
- Roasted red pepper strips
- Artichoke Hearts packed in oil
- Parmesan
- Optional: Pepperoncini and Black Olives


Pizza #2
- Precooked Shrimp (tails removed)
- Corn (canned or frozen)
- 3 scallions, chopped
- Pesto
- Fat Free Feta

To rice your cauliflower:
Take head of cauliflower and remove stems and leaves
Coarsely chop and throw into you food processor
Pulse until cauliflower resemble coarse grain (do not over-pulse as this will create a puree)
Place in a microwave safe container and microwave on high for 8 min.

Directions:
Preheat oven(s) to 450
Mix crust ingredients
Generously spray baking sheets with Pam (mine stuck and I ended up having to pry them off)
Now spread your crust mixture over the baking sheet in whatever shape you please
Brush with olive oil or spray with Pam to aid in browning
Bake for 15 minutes
Remove from oven and top with toppings and cheese (I like to put most of my toppings under the cheese so the cheese melts down and attaches all the toppings like a delicious glue)
***Note your pizza will not be in the oven for long so heat up any cold toppings on the stove or microwave before throwing them on***
Stick your pies back in the oven and cook 5-10 min longer until cheese becomes bubbly and delicious

Slice and Enjoy :-)

Wednesday, August 8, 2012

Mini Cheesecakes

OMG! These are amazing! I was out perusing WalMart's grocery section with my mom today and decided to try 2 things I had never had before, but they sounded like they might go good together for a quick sweet snack.  Here they are...Quaker Vanilla Creme Brulee Rice Snacks and Laughing Cow's new Cinnamon Cream flavored cream cheese spread.
I got home from the store, cracked open the bag and a wedge of the cream cheese, slathered it on, took a bite and then....the skies opened up, I felt like I was floating, and the prospect of eating healthy became even more of a reality.  It tasted just like a little mini cheesecake.  Then I remembered I had some strawberries in the fridge...oh yeah...you know where I'm going with this.  Magic! I'm officially in love :-) The only thing I would have changed is putting a smaller piece of strawberry on to really showcase the amazing flavor of the rice cake and cream cheese...otherwise it will just taste like a crunchy strawberry

Note: You know when it's not quite strawberry season and your strawberries are hard and bitter.  If you cut up your strawberries and throw them in a tupperware with a couple packets of Truvia, your strawberries will become both juicy and sweet.  That is what I do 95% of the time when my strawberries are just not up to par.  I especially like doing it with this particular recipe because it makes them taste more like the strawberries used on traditional cheesecake strawberries (kind of syrupy and sweet) :-)

Calories for 6 rice snacks and one wedge of cheese: 100

Asian Salad

(Picture to come)

Dressing:
- 2 T. Trader Joe's (or any other 25-30 cal per T.) Sweet Chili Sauce 50
- 2 T. Pineapple Juice 16
Directions:
Mix

Salad:
- Romaine or Spinach
- Sliced Roasted Red Peppers
- Mandarin Oranges (canned)
- Frozen, Precooked Grilled Chicken Strips
- Slivered Almonds
Directions:
If you need me to tell you how to make a salad we've got bigger problems than a high number on the scale...the only thing I might mention is top with the almonds after you toss the rest of the ingredients with the dressing so they stay crunchy ;-)

Lettuce Wraps

Forgoing bread can be one of the quickest ways to cut some unnecessary carbs and calories.  I guess I wouldn't call this a recipe, but more a concept...you can stuff your leaves with whatever you have lying around whether it be leftovers from the night before, or 3 week old produce on the verge of growing white fuzzies :-)
You can think of lettuce as replacing bread on a sandwich or you can think of it as a handheld salad.  For example, you could stuff it with chicken, walnuts, strawberries and blue cheese and dip it in a raspberry vinaigrette.
Serve your wraps with some fruit, I chose half of a grapefruit sprinkled with Truvia, and you have yourself a well-rounded, and surprisingly satisfying, lunch :-)

Ingredients:
Romaine Lettuce
Thin-sliced Turkey from the deli
Center cut or turkey bacon
1 T. Yogurt-based Ranch Dressing (to dip)

Directions:
Roll it up, Dip it, Eat it

Tuesday, August 7, 2012

Bacon-Wrapped Egg Muffins


These are my new most favorite things in the whole world! I have been making these every other day (only because there are 3 of us devouring them) otherwise these could easily last one person a week.  They are great fresh out of the oven, reheated, or cold :-) I eat them for breakfast, put them in my salads, you can toast and butter (lite butter of course) a lite english muffin and eat it like a samich.  Or maybe throw some lite mayo on 2 pieces of bread and make an egg sandwich....the possibilities for these little handheld wonders are endless, AND they travel well.  Cook up a batch of these and throw one in your lunch for work or school for a quick protein boost.


Ingredients:
- 12 slices center cut or turkey bacon
- 12 medium or large eggs
- 2% sharp cheddar (shredded)

Directions:
Preheat oven to 400
Spray muffin tin with Pam
Cook bacon in microwave, but don't cook it too much as it will not be pliable
Immediately situate bacon around the circumference of each muffin tin
Crack eggs into the center
Sprinkle tops with cheese
Salt and Pepper to taste
Bake for 7-10 minutes depending on whether or not you like your yolk runny or solid

Salmon con Mojo

I got this recipe from a friend and it looked too interesting to pass up.  You see, I hate salmon! There is only one place I will eat salmon (Stone Mountain, GA Metro Diner's Salmon Bella Tower) other than that, it is always too fishy for my tastes.  I know, I know salmon is SOOO... good for me.  That is why, once in a blue moon, I will get a wild hair up my butt and try it again in hopes that I will find it...my once a week, go to salmon recipe.  So...here it goes....

...OH MY GOSH! Everyone, including my salmon-hating self, loved this meal! I brushed the salmon with olive oil, kosher salt and pepper, then grilled it on high for 4 minutes a side, then topped it with the sauce recipe below. AMAZING! Not fishy at all! You don't even taste the banana so don't be scared of it.  It is just used as a thickening agent.

Ingredients:
- 1/2 c lime juice
- 1/2-1 c ripe banana
- 1/2 c olive oil
- 1 c cilantro
- 2 heads shallots
- 2 cloves minced garlic
- 1/2 c Worcestershire sauce
- 1 t kosher salt
- 1 1/2 t black pepper
- Salmon

Directions:
Combine all ingredients in a blender and puree until smooth.  Spoon on top of lightly grilled salmon.


Buffalo Chicken Pita

I was craving chicken wings for lunch today, but 10 wings at Taco Mac are 876 Calories!!! Crazy! Beings that A) I don't live near a Taco Mac,  B) My calorie limit for the day is 1000,   and C) I knew I could not sustain myself on 10 wings for the entire day...I looked in the freezer and pulled out my go to "fried chicken" (aka Morningstar Farms Chick Patties).  I LOVE these! Anytime I am craving fried chicken I grab one of these babies.  I love them on a lite bun with lite mayo and lettuce (tastes just like a Burger King chicken sandwich), turned into a quick chicken cordon bleu, chicken parmigiana, cut up and thrown in a salad, or, in today's case, cut up and thrown into a toasted pita.
Ingredients:
- 1/2 Whole Wheat Pita
- 1 Morningstar Farms Chik Patty
- Franks Red hot sauce (or other buffalo-type hot sauce)
- 1 T. Yogurt-Based Blue Cheese Dressing
- Iceberg Lettuce
- Cucumber
- Optional: 1 wedge Laughing Cow Blue Cheese (add 35 cal)

Directions:
Cut lettuce into bite-sized pieces
Dice cucumber
Toss lettuce and cucumber with dressing
Heat Chick Patty in microwave according to package directions (1 min for 1, 2 min for 2), dice chicken into bite-size pieces and place in ziploc bag, throw in some Franks hot sauce and shake to coat
Cut the pita in half, spray with Pam, and toast in a skillet until a few dark spots appear and pita is pliable
If you want it super blue cheesy crumble some Laughing Cow Blue Cheese in there too
Stuff with salad and chicken and Enjoy

Calories: 250

Monday, August 6, 2012

2 Second Breakfast Parfait


Okay, so it's not really a parfait, but that's what makes it 2 seconds :-) I have been making this nearly every day for breakfast because it is SO easy.  Trying different recipes is fun, don't get me wrong, but everyone needs a quick, mindless, go-to recipe for each meal.  That is what many people's downfall is.  They come to a point in their diet where they are in a hurry and frantically searching for something healthy to eat.  They finally say "screw it!" grab a bag of potato chips, burger at McDonald's, etc, and end up hating themselves in the morning.  Don't be these people.  As you explore different fabulous 3 hour recipes make sure you have a few quick go-to's in there.


(I like to list exactly what I use. That DOES NOT mean you have to use that brand.  I don't get paid to name drop and, as of yet, I don't receive free samples or any compensation of any sort for name-dropping...unfortunately....because I'm broke)
Ingredients:
- 1/4 c. Lite 'n' Fit Vanilla Yogurt (or enough to coat your fruit)
- 1/4 c. Cascadian Farms Granola Cereal (any flavor)
- Whatever fruit you have lying around cut into bite sized morsels (today it was bananas, grapes, and apples for me)

Directions
- Mix fruit with yogurt
- Top with granola (I like to top mine as I go so it stays crisp)
- Eat immediately
(See I told you it took 2 seconds :-) )